
")
Woodturning techniques
Woodturning techniques

- Wet or dry? Cut or scaffold? Short or long? Round or edgy? Brushing? Do they color? - No, I don't want to cut my hair here! The above questions have also asked Drechsler and often answered with astonishing creativity. In the course of the long tradition, which the Drechsler trade can look back on, the most diverse working techniques have emerged. I would like to present some of these techniques, especially those that I have already dealt with, in the following contributions.
 You can still often discover them in museums, sometimes in huge dimensions: threaded spindles made of wood! - What could be better than trying out whether we can create a beautiful wooden thread ourselves!
 The production of wooden threads with a cutting stock and tap is described in great detail on Berthold Cremer's
 ![]() Website von Berthold Cremer website. The acquisition costs for these tools naturally increase proportionally with the nominal diameter. For example, if you want to rework the old height-adjustable stool (picture 1) in the traditional way, the right cutting equipment would probably exceed the €1000.00 limit! Since I don't own any such tools myself, I enthusiastically took the opportunity to make two spindles and the matching crosswood nuts during a visit to master wood turner Alfred Baumann.
Website von Berthold Cremer website. The acquisition costs for these tools naturally increase proportionally with the nominal diameter. For example, if you want to rework the old height-adjustable stool (picture 1) in the traditional way, the right cutting equipment would probably exceed the €1000.00 limit! Since I don't own any such tools myself, I enthusiastically took the opportunity to make two spindles and the matching crosswood nuts during a visit to master wood turner Alfred Baumann.
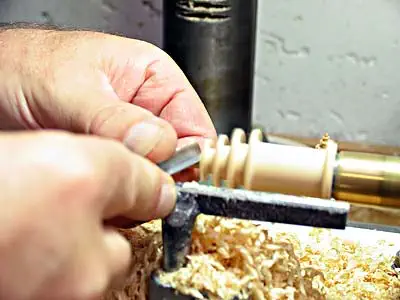
 Anyone who wants to learn the technique of thread chasing only needs a single pair of chasers to start with, in addition to a lathe whose spindle speed can be reduced to between 200 and 400 revolutions per minute. These comparatively low entry costs, which can be reduced even further by making suitable tool books yourself, are undoubtedly offset by a more or less long training period that depends on the skill and patience of the person doing the work! Once chasing is mastered safely, it fits seamlessly into the rest of the manufacturing process.
 I would like to use this (not entirely accurate) term to describe decoration techniques that, in the professional sector, would probably be carried out using milling machines. For experiments or for processing individual pieces, using the lathe for this purpose is by no means an emergency solution, but - as my first experiment (Figure 1) shows - is actually particularly attractive.
1) It is performed on a lathe.
2) The job description of the metal presser includes turning the wooden presser shapes.
3) Because of 1) and 2), wood turners and metal spinners were also traditionally organized in common guilds.
Due to the introduction of modern technologies (e.g. deep-drawing processes), metal spinning has lost a lot of its economic importance. This attractive technique is still valid today for individual pieces or small series, especially for works with craftsmanship/artistic demands.
 Making a wooden ball that is as precise as possible with a precisely specified diameter and a high surface quality in a reasonable amount of time is one of the supreme disciplines of wood turning and requires practice and experience. Anyone who has finally trained their dexterity and a sense of proportion and/or even invested in a ball turning device may then realize with disillusionment that they can't do much with wooden balls! Spannagel already warned in 1940 in his wood turning work against the use of the spherical shape as a design element on turned objects:
 One can argue about whether the adhesive tape chuck actually represents an independent lining, because basically the adhesive tape can only secure or support a workpiece that is already held and centered by a suitable holder. Nevertheless, I think it makes sense to discuss it separately in my - gradually growing - list of the different clamping methods, because the more options you know, the easier it is to have the most useful clamping devices for your own field of activity, especially in difficult and/or unusual ones choose the most suitable situation!
 Once I found this short paragraph in a Woodturner's book about an interesting peculiarity of turning techniques and it immediately turned out to become my favorite hobby, (at least for a while):
Left-turning
Freely translated from:
"Der Drechsler" by Steinert and Hegewald
VEB Fachbuchverlag Leipzig, Germany
5.Aufl. 1981
 Despite all the fascination that left-hand turning spontaneously exerted on me, I of course didn't know whether it would give me countless hours of joy and relaxation over many years or whether it would turn out from the first few attempts that there was actually no significant difference to creating would be noticeable on the normal lathe. So I decided to build my first left-hand lathe as simply as cheaply and as space-saving as possible. In addition to a particularly simple solution, I was of course also looking for a variant that could be implemented quickly, because I was really excited to see my first left-hand turning results.
 The donut lining has a permanent place in art turning (Chinese balls!). It offers the possibility of evenly distributing holes or simple circular ornaments on the surface by spanning a ball several times. The donut food is a typical home-made food because its shape and size are determined by the size of the object being exciting. That's why making it only really makes sense when you need it. However, it is definitely worth saving a chuck once it has been made for later reuse, because it can - within certain limits - be adapted to new tasks: (lengthening or shortening the spacers, enlarging or lining the recess for the workpiece holder).
 For my first attempts at left-hand turning I had to use a few small, ancient sculptor's chisels that I hadn't used for carving in a long time due to various defects. Although this worked very well, the tarnished and sometimes even rusty irons with their dirty and worn handles, which were also quite short for turning, of course could not meet my aesthetic requirements in the long term.
 Not only does it look very atmospheric, it is also extremely useful: a light source inside a wooden hat clamped into the lathe enables the correct wall thickness to be reliably assessed when the upper part of the hat is finished turning, which can hardly be measured otherwise. But how do you get the light into the rotating hat? The solution: making a light lining!
 The old watchmaker's magnifying glass (in the picture on the left) has served me well for decades in my job and hobby. Recently, when I went to reach for it, I was surprised to see that the lens was lying next to the torn tube. I immediately discard the most obvious idea of using glue: this is a good opportunity to try out the old technique of sprinkling on a real example!
 You have looked at the previous pages with interest and now know how I became aware of left-hand turning, have seen how I set up a workstation for left-hand turning with great enthusiasm and are asking: When will it finally start? Then you can now look over my shoulder as I make a ten-piece set with hanging Advent figurines and enjoy the fascination that this extraordinarily attractive technique has. However, if you have already followed my example and created a way for yourself to do left-hand turning, even if it is just a temporary solution for a preliminary attempt, I recommend that you download and print out a complete working drawing in my download area.
 Zu Visit to Thuringia. Shared walk in the forest. Talking shop about green wood turning. Unfortunately, I have to admit to my friend Manfred that I haven't had much practical experience with it so far.At public woodturning demonstrations, the wet wood turners are usually rightly considered to be a particular crowd puller: first, the huge rattling that occurs when roughing the usually huge, freshly cut blank due to the weight and the associated imbalance makes the visitors sit up and take notice. Later, the consistently cutting peeling technique required by the wet wood makes it possible to let wide chips fly through the hall as meter-long streamers! Then the quick way of working that is possible with this technology is fascinating, but also necessary, because hesitant work or even longer interruptions in work would lead to the areas of the workpiece that have already been turned thinner drying and shrinking much more quickly than more voluminous areas. (Additional moistening of areas that dry too quickly can counteract the risk of cracks forming and/or warping.) Step by step, the long unscrewing hook now pulls the chips out of the rapidly growing cavity! The massive blank has already become a delicate hollow body! WOW! Wall thicknesses of 2mm for portable wooden hats or even 1mm for lampshades that allow pleasantly warm light to shine through are no problem for the experienced greenwood turner. Wood dust? -No report! Green wood processing is certainly healthier for the lungs and eyes.
 By using suitable face plate segments, the clamping range of almost all modern self-centering four-jaw lathe chucks can be significantly expanded upwards. The four segments have numerous threaded holes. Depending on the manufacturer, the scope of delivery includes round or square clamping claws that can be screwed into the threaded holes that match the respective clamping diameter.