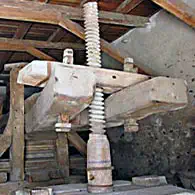
 You can still often discover them in museums, sometimes in huge dimensions: threaded spindles made of wood! - What could be better than trying out whether we can create a beautiful wooden thread ourselves!
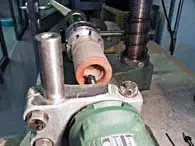 Juicers, wooden screw clamps in carpentry shops, front and back pliers of old planing benches, height-adjustable stools, shoemakers' tension strips are typical areas of application and evidence of old craftsmanship. They make it clear that, assuming the right choice of wood and appropriate dimensioning, wooden threads can withstand considerable forces! But woodturners of earlier times also liked to use threads as detachable connecting elements in small, less conspicuous dimensions: tiny needle bushes with screw-on lids made of boxwood, chess figures made of bone, which often had to be made from several individual parts due to the small material dimensions, were screwed together. Shafts of floor and table lamps were screwed into the base using wooden threads. Height-adjustable music stands had wooden locking screws.
To get straight to the point: The most modern and versatile method of obtaining a wide range of clean threads with different pitches, diameters and profiles in many types of wood is milling. In the simplest case, the piece is attached to a threaded spindle with the appropriate pitch (the so-called cartridge). The spindle is guided in a fixed nut with as little play as possible. If the spindle is rotated slowly (by hand), the workpiece simultaneously performs a forward movement in accordance with the pitch specified by the spindle, which feeds it to a rapidly rotating milling cutter. Examples of such simple devices include the icon_external_dark Sören Berger Thread Creator or the additional thread cutting device of the icon_external_dark Ornamental Turner from TEKNATOOL. Since these two products are not available on the German market, I google further and find the icon_external_dark thread cutting device DB 1430 - somewhat hidden - in the Heinz Wiedemann catalog. And for those who prefer to build everything themselves, here is a construction manual - in English but well illustrated - icon_external_dark Threding-jig for the wood turning.
Before you decide to buy or build such a simple device yourself, you should know its disadvantages:
1. You need a suitable sample spindle including the associated spindle nut for each pitch to be manufactured.
2. Since the workpiece also has to move forward during rotation, work can only be done "on the fly", which means you have to do without the tailstock and center center as a clamping aid. This means that only relatively short threaded spindle lengths are possible.
More elaborately constructed devices that avoid these disadvantages are copied from the metal lathe: They use a change gear. They can be found as attachments for the lathe
z. B. Gewindefräseinrichtung GF 220 der ![]() Fa. Hager or as a standalone device
Fa. Hager or as a standalone device
z.B Gewindefräseinrichtungen GFE 1 und GFE 2 der ![]() Fa. Eugen Mitsch oder das Gewindefräs- und Kaneliergerät GFK 500 der
Fa. Eugen Mitsch oder das Gewindefräs- und Kaneliergerät GFK 500 der ![]() Fa. Steinert . Anyone considering purchasing such a device should, in addition to the prices, also compare the center heights and the maximum possible spindle lengths and, if necessary, ask whether left-hand threads and/or additional pitches can also be achieved.
Fa. Steinert . Anyone considering purchasing such a device should, in addition to the prices, also compare the center heights and the maximum possible spindle lengths and, if necessary, ask whether left-hand threads and/or additional pitches can also be achieved.
Would you now like to know which device I chose? - Well, happy people - like me - already have (almost) everything they need! In this case it is an old general purpose-Kleinwerkzeugmaschine DBF.
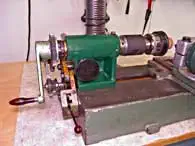 DBF stands for Drehen-Bohren-Fräsen, that means turning-drilling-milling . The structural parts for the lathe also included a change gear to drive the lead screw. A crank supplied was used for manual drive when cutting threads. The parts, if any are still available, are quickly dug out and assembled. I have an M 33 x 3.5 adapter for the M 27 spindle thread of the small headstock. This means I can pre-turn my workpieces on the lathe and leave them in the same chuck for thread milling. This guarantees good concentricity! The DBF device also included a 43 mm clamping flange that I can attach to the support and use as a mount for my Bosch router motor. When the milling cutters I have already ordered arrive, the trial operation can begin!
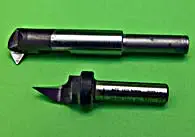 With a milling cutter for internal threads you can also mill external threads, but only to a very limited length due to the length of the milling cutter shaft. An additional milling cutter is required for threaded spindles of any length. In order for the spindle and nut to fit together, both cutters must have the same nominal angle. Although there are no standardized thread standards
 ![]() standardisierte Gewindenormen for wood threads, it seems sensible to adopt the 60° standard for metric ISO pointed threads in metalworking.
standardisierte Gewindenormen for wood threads, it seems sensible to adopt the 60° standard for metric ISO pointed threads in metalworking.
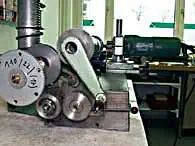 The cutters have been delivered. The first useful application that comes to mind is making short M 33 x3.5 threaded sockets to neatly store my lathe chucks. You can buy such threaded sockets made of hard PVC or aluminum, but if they are made of wood and made yourself, they are the ideal introductory project to gain your first experience in thread milling! A look at the incline table in the yellowed operating instructions for the DBF device brings disillusionment: a 3.5 incline cannot be achieved with the gears supplied! Even doing the math myself doesn't help me. At least I find out that I need additional gears with Module 1.
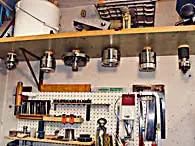 After a long search I find a wheel with 110 teeth and a pinion with 22 teeth. Both come from a defective peristaltic pump. This results in a gear ratio of 1:5. So: put together a wheel set for a 0.7 pitch, switch the 110 wheel and the 22 pinion somewhere in between! After a bit of "precision mechanical fiddling" I can confirm my theory (0.7 x 5 = 3.5) in practice by carefully turning the crank. Voila! A little later, all of my chucks are neatly hung on precisely fitting threaded sockets.
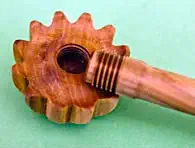 The next project I would like to tackle is a whisk, because I think a screw connection between the handle and the head is an exemplary solution: If you made the whisk in one piece, you would have to remove an unnecessary amount of wood in the entire handle area. A bung-tenon connection is less durable and additional gluing is not an option due to the constant contact with water and food! The two parts are quickly prepared on the lathe, but then there is another problem: my milling cutter has a head that is too thick; This means that internal threads with such a small diameter cannot be produced.
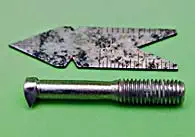 So I decide to make a smaller cutter myself. I choose a short (tempered) M8 hexagon screw as the blank. For the flank angle, which I check with a test gauge for thread cutting steels, I choose 55°. With the same cutting depth, the thread is not cut so sharply on the outside diameter and wood tears are further reduced. I am very satisfied with the milling result (picture 6): clean, tear-free threads were created in both the soft alder wood of the whisk head and the hard ash wood of the handle!
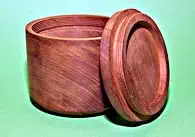 Always working with long wood gets boring after a while! That's why I would like to mill threads in cross wood. Years ago I roughly pre-rolled a mahogany can and put it in a safe place to dry and then literally forgot about it! The long break was obviously worth it; the workpiece has measurably shrunk to a slight oval. So, carefully tighten everything again and then mill the threads for the can and screw cap!
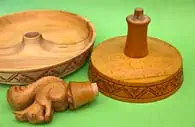 As I dig out the pre-rolled mahogany box, I also come across the individual parts of a cake stand - one of my father's works: dirt, yellowed paint and water stains have made them unsightly over the years of use. The glued bung and tenon connections have come loose. Because it is a memory of my father, I saved the pieces. Because the design is no longer really up to date, I kept putting off repairs and refreshing it. The idea of retrofitting the individual parts with wooden threaded connections means that this project suddenly becomes a priority! This means that the bulky object can be dismantled and stored away to save space until the next Christmas, so that you can then offer tasty nuts for sale in a new look and awaken old childhood memories.
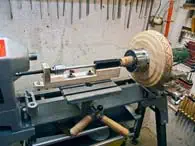 But there is a problem: the center height of my thread milling device is nowhere near enough to accommodate the large diameters of the cake stand shells! Although the small headstock of my DBF device can also be attached to the column of the drilling and milling stand in a height-adjustable manner, additional measures would then be necessary to ensure that the lead screw can rotate. Instead of worrying about procuring suitable components such as chains or toothed belts and suitable wheels, I am wondering whether I can reach my goal more quickly if I use existing material for this specific purpose and build a simple thread milling device based on the principle (without gear transmission). I described at the beginning of this article.
The core of the device is a steel shaft that can be rotated and moved in a suitable bearing bush. On one side of this shaft I attached a wooden spindle thread M33 x 3.5 to hold a lathe chuck with a clamped workpiece. A gear drill chuck is attached to the other end. A threaded spindle with the pitch to be copied is clamped into this. The associated spindle nut is pressed into a multiplex carrier. I attached this part of the device to the lower part of the hand rest of my lathe in an adjustable manner.
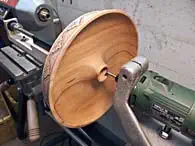 For the second part of the device, the holder for the milling motor with the feed device, I can use a cross support that comes from an old mechanic's lathe and which I had previously prepared for installation on the bench bed of my Teknatool. I just need to replace the turning tool holder with a power tool holder with a 43mm clamping collar. The frequent conversion and set-up work on the lathe is a bit annoying, but the internal threads are achieved straight away with satisfactory quality.
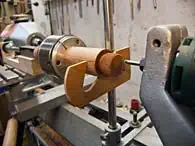 When I tackled the required external threads, my design turned out to be somewhat unstable: Because of the very thin shaft, the lightweight workpieces wobble when milling, which of course affects the thread quality. That's why I quickly make a simple hook lynette from a scrap of plywood, which supports the workpiece quite effectively. The threads are now significantly cleaner!
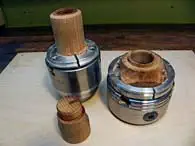 After I have milled a few auxiliary threads that I need to attach the individual parts of the cake stand to the lathe spindle without causing damage during surface processing (scraping off the old paint and subsequent thorough sanding), I first have to get my little hobby workshop back in order: This Constantly switching from turning to thread cutting was a bit tedious and caused quite a bit of chaos. Although the results are certainly impressive, if I have to do similar work again, I will decide to add a "bicycle chain" to my DBF device in order to increase the tip height!
Fine-tuning
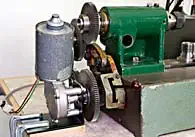 Of course I could have left it with the crank as the drive. But the slow, uniform rotation of the small 24 V geared motor leads to a further, albeit slight, improvement in the quality of the milling result. And if you're going to keep everything, you're supposed to use it at some point!
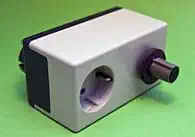 Unfortunately, my milling motor does not have an integrated speed controller. In order to avoid burn marks in the milling pattern, especially with harder types of wood, I use a simple speed controller that I originally built for my drill.
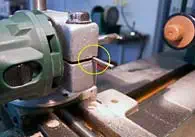 Unfortunately, the wide, robust design of my clamping device for the milling motor prevented me from locking the spindle to change the milling cutter without having to remove the motor from the holder each time. A hole exactly on the clamping slot (marked by a yellow circle in the picture!) provides a remedy here without noticeably worsening the strength of the holder.
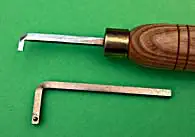 Internal threads that are milled into a blind hole, or external threads whose bolt at the thread end has a larger diameter than the thread itself (e.g. screw head), can of course never be milled out exactly to the stop. So that the screw or nut can still be turned to the end, it is common practice to undercut such threads. While this can be done with a narrow plate steel or wide parting steel for external threads, a special angled tool is required for internal threads. I sharpened such a tool from a square wrench I happened to have.

