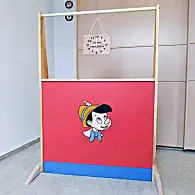
 I transferred the outline of the clever puppet head onto hardboard using a pen plotter, sawed it out with a jigsaw, painted it and glued it to the stage. The dial to indicate the start of the next performance gives the toy theater the touch of a professional traveling puppet stage! I was able to create it thanks to the optional laser kit. I think both details really spice up the little project! I would also like to use these opportunities for future projects. However, the mechanical conversion from pen to laser is a bit complicated! When switching between mDraw and BenBox, the appropriate firmware must also be loaded onto the Arduino-based Orion board and different microsteps must be selected on the stepper motor drivers. That's why I decided to build a completely new control system. I therefore purchased a grbl shield and pololu-compatible stepper motor drivers for my existing and Arduino.
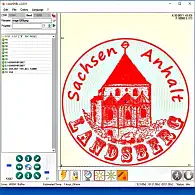
 Since neither mDraw nor Benbox work with the grbl firmware, I will use Laser-grbl, a freeware tool that, in my opinion, some commercial software has to hide from! I discovered the program by chance while searching the Internet for information about grbl. Unfortunately, I also had to make two observations that were less pleasant at the moment:
1) The control of servo motors (pen movers) is not supported by grbl!
2) The homing is carried out by grbl over three axes, but the plotter only has two axes!
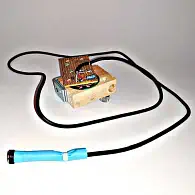
 A modified grbl version "grbl-servo", which I found on the Internet, initially provides a solution. Disadvantage: When switching from pen to laser, I now have to constantly change the firmware! The illustration below shows a home-made pen mover that avoids this disadvantage. I carefully removed the housing and fan blades from a PC fan so that a small external rotor motor is now left. I glued this into a wooden block, which also has a suitable hole with a locking screw for the drawing pencil. If the motor is de-energized, the two chair angles attached to the wooden block as a return weight tilt the drawing pencil back. When the motor receives power, it presses the pen onto the drawing surface, similar to a rotating magnet. This means it can be controlled by the same signal that switches the laser.
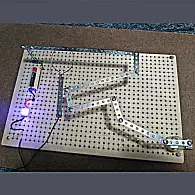
 To test the dimensional accuracy of the plotted drawings, I created a grid in Inkscape with 10mm line spacing and had the plotter draw it on a sheet of plywood. This time the WOW! effect is inevitable! The drawing on the rough wooden surface is very clean and true to size! But: Can you make something breakable out of the record? Sure, of course! I carefully mark the intersection points and drill 4.1mm holes. Pure hard work! This is how a versatile experimental board was created and I hope to be able to use it to teach my grandson a few basics of electrical engineering! The illustration shows a variant of a skill game in which the aim is to follow a given path without touching it. - Much faster than expected, a first useful application example for my new pen plotter was created! And: If grandpa doesn't lose patience and grandson loses interest, perhaps there will be an "Electrical Experiments" category here!

